Posts Tagged ‘FTP’
How to upload your web files with FTP
Mar 17 13
The guide below will show you how to upload your website files to the web server using FTP (File Transfer Protocol)
To start with you will need your FTP user details. You will receive these in your confirmation email when you order your hosting package. If you would like us to resend the details please request this by emailing office@your-name-here.co.uk
There are many FTP programs but probably the most popular and the one we recommend is Filezilla. Click here to download and start the program.
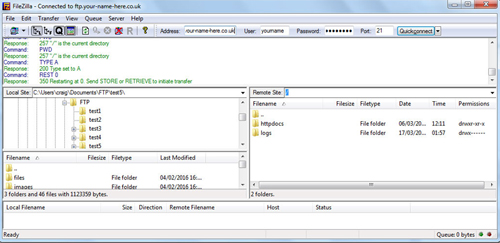
 Once you have downloaded this, open up Filezilla and you will see a ‘Quick Connect’ button in the top right of the screen.
Before you click on this you need to enter your user details which are the host address, the username and the password.
Then click Quick Connect, and double click on the ‘httpdocs’ folder to enter your hosting web space.
Once you are connected you will have 2 split windows, the left hand side is the files on your computer, the right hand side is your web space, in order to upload your files you need to either drag and drop from left to right, or double click on your left hand files to upload to the right.
You will notice the transfer progress on the bottom of the screen. If all is well Filezilla should display the files you have uploaded on the right hand screen and your website should now be visible in your internet browser window. After every new upload you will need to refresh your browser.
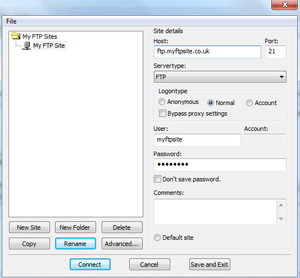
For multiple sites there is a Site Manager option. Click on ‘File’ in the top left corner and you will be given the following screen, which allows you to enter and save the user details, so you can easily connect at the click of a button next time:
The host address, username and password will be stored in here. You simply click on ‘Connect’ to gain access to your web files on the split screen section as shown above.
How do I upload my webfiles?
Sep 09 29
There are two main ways to upload your website files to your web hosting server:
FTP (File Transfer Protocol)
The most common way to upload your files is through FTP. This requires an FTP program. There are many FTP programs out there but we would recommend Filezilla as it is very user friendly. You can download Filezilla free from the following address:
http://filezilla-project.org/ 
and click on ‘Download Filezilla client’
Once you have downloaded this, open up Filezilla and click on the top left icon (computer screen) and click ‘New Site’ and enter ****domain*** or any description as this is just the label for the site, then enter the following details into the boxes:
Host = Given in your web hosting welcome email
Port = 21
Servertype = FTP
LogonType = Change the drop down list to Normal
Username = Given in your web hosting welcome email
Password = Given in your web hosting welcome email
Then click Connect, and double click on the ‘httpdocs’ folder to enter
your hosting webspace.
Once you are connected you will have 2 split windows, the left hand side is the files on your computer, the right hand side is your web space, in order to upload your files you need to either drag and drop from left to right, or double click on your left hand files to upload to the right. You will notice the transfer progress on the bottom of the screen. If all is well Filezilla should display the files you have uploaded on the right hand screen and your website should now be visible in your internet browser window.
Using the Plesk File Manager to upload your files.
This method comes on any package hosted on a Plesk server 
You will be given your control panel user details in your welcome email. Once logged into the control panel you will see this icon. Click on this and you will again be connected to your server’s web directories and again click on ‘httpdocs’ to manage your webfiles.
How to use the File Manager
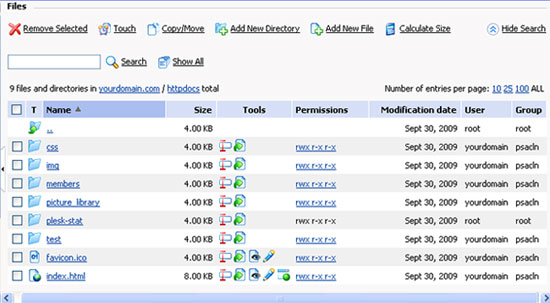
Once you click into your httpdocs directory your webfiles will appear as in the image below:

Other commands you can do from here would be to create or delete folders and files, change file and folder permissions, edit existing files and rename files and folder. Here are a few more helpful tips to use with Plesk’s File Manager:
- To upload a file to the current directory, click add new file, then either browse your computer or ‘create new’ file and specify its location. Click OK.
- To create a folder that will be located in the current directory, click ‘Add New Directory’, then type in the directory name in the Directory name field and click OK.
- To edit an existing file source, click the Edit File icon (pencil). The File Manager’s editor window will open, allowing you to edit the file source. When you have finished with your changes, click ‘Save’ to save the file then OK to save the file and return to the File Manager panel.
- To remove a file or directory, select the corresponding checkbox, and click Remove Selected.
- To rename a directory or file, click on the Rename icon (small rectangle). A new page will open allowing you to rename the selected file or directory. Type in a new name and click OK.
- To change permissions for a file or directory, click on the permissions icon (which will look something like rw- r– r–) the permissions settings page will open, allowing you to set the required permissions. Select the correct settings for the file then click OK to submit.


