Posts Tagged ‘domain email’
How to set up your email account on a Galaxy S3
Mar 13 19
The following instructions are for setting up your domain’s email address on a Samsung Galaxy S3:
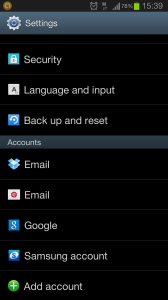
Firstly go to the Settings section of your Phone and scroll down to Add Account
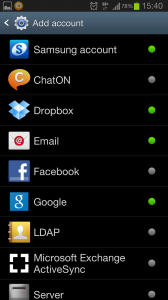
Then choose Email to enter your account settings.
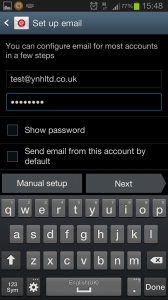
Enter you email address and password, then click on Manual Setup
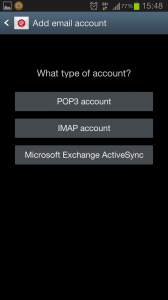
You will then be asked which type of account you would like to set up, in most cases this will be POP3
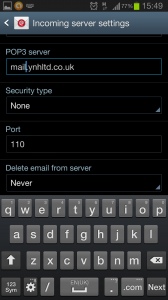
You will then be asked for the address of your POP server which is mail.yourdomainname.co.uk (just replace yourdomainname.co.uk with your actual domain name)
You don’t need to enter a security type and the port number should be 110 (which it will be by default)
Then go to Next
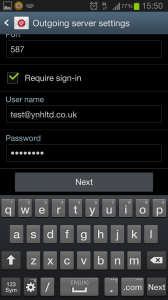
You then need to enter the settings for the Outgoing Mailserver. Tick the ‘Require Sign In’ box and then enter your email address and password again.
Then click on Next.
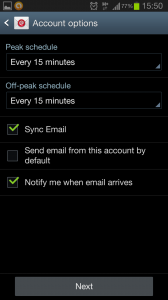
You will then be shown additional account options such as receiving a notification when an email arrives.
If this is the main email account on your phone you can tick the box which says Send email from this account by default.
Then click on Next.
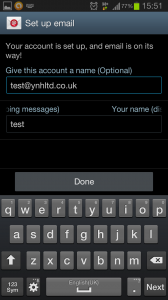
The account is then set up. You can give the account a name if you wish and then enter your name, as you want it to appear in a recipient’s mailbox.
Then click on Next and you’re done.
Make the most of your Spam Filter
Oct 09 07
The fight against Spam is a significant challenge that you face daily, and it continues to be one of the biggest problems on the Internet. Spammers are clever and they will continually conjure up new ways to bypass spam filters, so unwanted email will always be there, but you can dramatically reduce the amount of spam you receive if you use your Spam filter correctly.
Spam Assassin 
At Your-Name Here our choice of default Spam Filter is Spam Assassin.
SpamAssassin uses a variety of spam-detection techniques, that includes sophisticated scoring filters, Bayesian statistics, external programs, blacklists and online databases.
Used correctly, it can be a very effective deterrent against unwanted email.
How to configure Spam Assassin.
- Firstly login to your Plesk control panel.
- Click on the Mail icon under Services.
- Click on the email address you would like to configure settings for.
- Then click on the Spam Filter icon in the Tools section.
- In the Preferences section, you firstly set the score/tolerance level that email must hit before it is recognised as Spam. Each email is scored between 1 and 10 . As an example, if you were to receive an email with the subject ‘Buy Viagra Now’ that would score 8 or 9 as it is obviously Spam. The default setting is 7, which is usually a good place to start, but if you feel Spam is not being recognised enough, you just lower it to 6 or 5 and see how it goes.
- The What to do with Spam section gives you the choice to remove Spam automatically when it comes to the mailbox, or still deliver the email and mark it as xxxSpamxxx. If you want to include into the subject line the number of points that messages score, type _SCORE_ in this box. This will help you determine the best score setting to have.
- Next is the Blacklist section which allows you block specific addresses or domains that you do not want to receive mail from. You can add muliple entries, seperated by a tab, a colon or a comma. If you do not want to receive anything from any address at a particular domain you can use * as a wildcard. Just type *@domain.com and any user at that domain will be blacklisted.
- Similarly there is also a Whitelist section. If you want to be sure you do not miss any emails from specific senders, you can add multiple entries to your Whitelist in the same way.
- Click on the Training tab to improve accuracy of spam detection by training the spam filter on the e-mail messages that you have in your mailbox. Simply highlight an email and click on ‘It’s Spam’ or ‘Not Spam’ Once finished with training, you can remove spam e-mails from your mailbox using your e-mail program or Horde IMP Webmail interface.
- Once finished with your spam filter settings, remember to click the ‘Switch On’ icon, and then click OK.
That’s it! Your Spam filtering is now enabled and set to your specific requirements. The settings can be modified at any time in the same area of your Plesk control panel.
