Free Plesk Site Builder
Feb 10 04
Special Offer Extended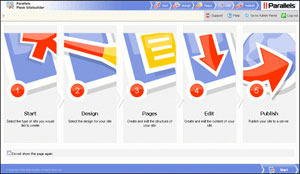
Due to the popularity of the Plesk Site Builder we have decided to extend the free offer for a further month. Purchase any domain with a hosting package and you will receive the Plesk Site Builder free of charge for 1 year.
Parallels Plesk Sitebuilder is an easy to use, scalable web application designed to create and manage websites. The software’s easy-to-use, five-step wizard and 14 dynamic modules make this software a powerful and flexible solution. The modules included are: Blog, Image Gallery, Guestbook, eShop, SitePal, Forum, Feedback, Registration, RSS Reader, Voting, Script, Area Map, File Download, SiteMap, External Page, and Flash Intro.
Getting started with WordPress
Feb 10 04
WordPress is one of the most popular Content Management Systems available, as of September 2009  it is used by over 200 million websites worldwide. It is primarily a blogging software but it can also be used as a general content management for standard websites.
We will shortly be launching a new ‘WordPress Hosting’ package, which will make it easy for you to set up and start writing your blog/website with a minimum of technical know-how. We’ll take care of the installation, set up the back end database and provide you with your user details. All you need to do is start typing!
Below is a guide which will enable you to have a fully working website or blog in minutes.
Once you login with the details we provide you, you will be presented with your WordPress Dashboard, which is the control panel that will take care of pretty much everything on your blog, form the writing of posts to the style and layout of your site.
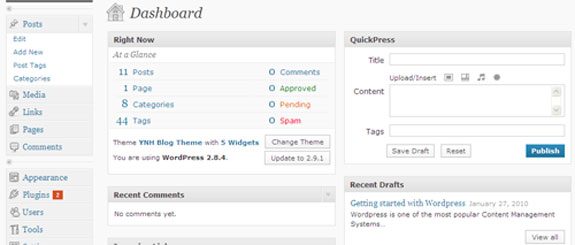
The first thing to do is choose the kind of layout you would like and this is done in the Appearance section under ‘Themes’ There are thousands of free themes available, just click on ‘add new theme’ and you can search through WordPress’s extensive list of available themes. Once you have chosen a theme click ‘install’ and WordPress will then upload that theme to your account. Then click on the ‘themes’ section and activate the theme you have just installed. Then visit your website and you will see your content presented in the layout and style of the theme you have chosen.
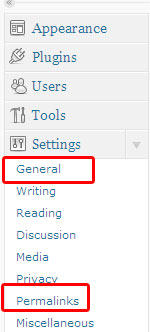
Once you have set up your theme you can then start to customize the website. When you first visit your site you will see the WordPress default tag line ‘Just another WordPress Blog’ To remove this click on ‘general’ in the Settings section and remove or replace the text in the Tagline field.
Next, you can go to your Permalinks section and modify the way your posts links are displayed. The default permalink structure uses question marks and a lot of numbers. e.g http://www.your-name-here.co.uk/blog/?p=123.
If you change this to the ‘day and name’ option your web url’s will look cleaner and this is a more search engine friendly method. See below:

You are now pretty much ready to start writing. WordPress does put a test post and test comment on your account. If you would like to remove them fist before you start, just go to the top left corner of your WordPress Dashboard and click on ‘Posts’ then ‘Edit’ and remove the default text, then do the same in the ‘Comments ‘ section.
Now you have your website style and you’re ready to go, you may will want to add some Plugins, which add extra functionality to your site. Anything you can think of to add to your blog or website, there is probably a WordPress plugin for it. Social networking Plugins are particularly popular.
You search for a Plugin the same way you would search for a Theme. Once you have installed your Plugin, go to the Plugins section of your Dashboard and click on ‘installed’ and then click on ‘activate’ In there are any further settings to configure the Plugin will appear in your dashboard sidebar, so you just click on the Plugin name and follow the instructions. Plugins are very useful and they can add so much to your site so it’s worth checking them out. You can find an excellent list of top WordPress Plugins here.
That’s it! You’re ready to go, so start creating your content.
One other thing we recommend you do, is sign up to Google Analytics as it is a great resource for checking your website/blog’s stats and it can really help you optimise your site for the search engines.
Use the Google Analytics plugin in the link above, then you just sign up for a Google account and copy the code Google give you, into the plugin you have installed.
A full guide to Google Analytics can be found here.
Plesk Site Builder Now Available
Nov 09 23
New Launch
We have recently introduced the Plesk Site Builder as an optional extra for all our hosting packages. For November and December we have a special introductory offer – Purchase any new Hosting Package and you will receive the Site Builder for free.
Plesk Sitebuilder includes an easy to use five-step wizard. No Web Design or programming experience is necessary.
- Create the design of your website (choose from many free templates)
- Structure the website.
- Edit the content.
- Define parameters.
- Publish the Website
For full details please visit our Site Builder page.
Email Scam – Internet Trademark Intellectual Property Rights
Oct 09 16
There seems to be a new wave of this particular scam email, usually from the ‘Domain name registration center in Shanghai’ or the ‘Domain name registration organisation of Asia’ or similar.
The email will read something like:
—–Original Message—–
> *From:* fiona [mailto:fiona@east-technology.org]
> *Sent:* 08 October 2009 08:34
> *To:* office@your-name-here.co.uk
> *Subject:* Re:Europeanarts-Intellectual property rights (To CEO)
> *Importance:* High
>
> Dear CEO,
>
> We are the domain name registration organization in Asia, which mainly
> deal with international company’s in Asia. We have something important
> need to confirm with your company.
>
> On Oct.7,2009, we received an application formally. One company named
> “Baldfiltering company” wanted to register the following domain names:
>
> your-name-here.asia
> your-name-here.cn
> your-name-here.com.cn
> your-name-here.com.hk
> your-name-here.com.tw
> your-name-here.hk
> your-name-here.cn
> your-name-here.tw
>
> and Internet Trademark:Europeanarts
>
> through our entity.
>
> After our initial examination, we found that the keyword and domain
> names applied for registration are as same as your company’s name and
> trademark. These days we are dealing with it. If you do not know this
> company, we doubt that they have other aims to buy these domain names.
> Now we have not finished the registration of Baldfiltering company
> yet, in order to deal with this issue better, Please contact us by
> telephone or email as soon as possible.
>
> Best Regards,
>
> Fiona
>
> **Auditing Department **
Do not be taken in by this, as it is nothing more than a misleading and dishonest marketing ploy.
They basically want you to contact them so they can explain the importance of you buying all those domain extensions from them.
If, for any reason you would like to buy the Hong Kong extension of your domain name that’s fine, but you should go through a trusted domain registration company.
The article in this link explains what happened when one domain owner replied. Notice the amounts they want to charge towards the bottom of the article. Also the many comments from other domain owners who have received similar emails.
Make the most of your Spam Filter
Oct 09 07
The fight against Spam is a significant challenge that you face daily, and it continues to be one of the biggest problems on the Internet. Spammers are clever and they will continually conjure up new ways to bypass spam filters, so unwanted email will always be there, but you can dramatically reduce the amount of spam you receive if you use your Spam filter correctly.
Spam Assassin 
At Your-Name Here our choice of default Spam Filter is Spam Assassin.
SpamAssassin uses a variety of spam-detection techniques, that includes sophisticated scoring filters, Bayesian statistics, external programs, blacklists and online databases.
Used correctly, it can be a very effective deterrent against unwanted email.
How to configure Spam Assassin.
- Firstly login to your Plesk control panel.
- Click on the Mail icon under Services.
- Click on the email address you would like to configure settings for.
- Then click on the Spam Filter icon in the Tools section.
- In the Preferences section, you firstly set the score/tolerance level that email must hit before it is recognised as Spam. Each email is scored between 1 and 10 . As an example, if you were to receive an email with the subject ‘Buy Viagra Now’ that would score 8 or 9 as it is obviously Spam. The default setting is 7, which is usually a good place to start, but if you feel Spam is not being recognised enough, you just lower it to 6 or 5 and see how it goes.
- The What to do with Spam section gives you the choice to remove Spam automatically when it comes to the mailbox, or still deliver the email and mark it as xxxSpamxxx. If you want to include into the subject line the number of points that messages score, type _SCORE_ in this box. This will help you determine the best score setting to have.
- Next is the Blacklist section which allows you block specific addresses or domains that you do not want to receive mail from. You can add muliple entries, seperated by a tab, a colon or a comma. If you do not want to receive anything from any address at a particular domain you can use * as a wildcard. Just type *@domain.com and any user at that domain will be blacklisted.
- Similarly there is also a Whitelist section. If you want to be sure you do not miss any emails from specific senders, you can add multiple entries to your Whitelist in the same way.
- Click on the Training tab to improve accuracy of spam detection by training the spam filter on the e-mail messages that you have in your mailbox. Simply highlight an email and click on ‘It’s Spam’ or ‘Not Spam’ Once finished with training, you can remove spam e-mails from your mailbox using your e-mail program or Horde IMP Webmail interface.
- Once finished with your spam filter settings, remember to click the ‘Switch On’ icon, and then click OK.
That’s it! Your Spam filtering is now enabled and set to your specific requirements. The settings can be modified at any time in the same area of your Plesk control panel.
How do I upload my webfiles?
Sep 09 29
There are two main ways to upload your website files to your web hosting server:
FTP (File Transfer Protocol)
The most common way to upload your files is through FTP. This requires an FTP program. There are many FTP programs out there but we would recommend Filezilla as it is very user friendly. You can download Filezilla free from the following address:
http://filezilla-project.org/ 
and click on ‘Download Filezilla client’
Once you have downloaded this, open up Filezilla and click on the top left icon (computer screen) and click ‘New Site’ and enter ****domain*** or any description as this is just the label for the site, then enter the following details into the boxes:
Host = Given in your web hosting welcome email
Port = 21
Servertype = FTP
LogonType = Change the drop down list to Normal
Username = Given in your web hosting welcome email
Password = Given in your web hosting welcome email
Then click Connect, and double click on the ‘httpdocs’ folder to enter
your hosting webspace.
Once you are connected you will have 2 split windows, the left hand side is the files on your computer, the right hand side is your web space, in order to upload your files you need to either drag and drop from left to right, or double click on your left hand files to upload to the right. You will notice the transfer progress on the bottom of the screen. If all is well Filezilla should display the files you have uploaded on the right hand screen and your website should now be visible in your internet browser window.
Using the Plesk File Manager to upload your files.
This method comes on any package hosted on a Plesk server 
You will be given your control panel user details in your welcome email. Once logged into the control panel you will see this icon. Click on this and you will again be connected to your server’s web directories and again click on ‘httpdocs’ to manage your webfiles.
How to use the File Manager
Once you click into your httpdocs directory your webfiles will appear as in the image below:
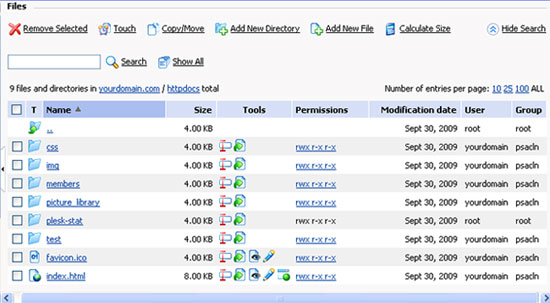
Other commands you can do from here would be to create or delete folders and files, change file and folder permissions, edit existing files and rename files and folder. Here are a few more helpful tips to use with Plesk’s File Manager:
- To upload a file to the current directory, click add new file, then either browse your computer or ‘create new’ file and specify its location. Click OK.
- To create a folder that will be located in the current directory, click ‘Add New Directory’, then type in the directory name in the Directory name field and click OK.
- To edit an existing file source, click the Edit File icon (pencil). The File Manager’s editor window will open, allowing you to edit the file source. When you have finished with your changes, click ‘Save’ to save the file then OK to save the file and return to the File Manager panel.
- To remove a file or directory, select the corresponding checkbox, and click Remove Selected.
- To rename a directory or file, click on the Rename icon (small rectangle). A new page will open allowing you to rename the selected file or directory. Type in a new name and click OK.
- To change permissions for a file or directory, click on the permissions icon (which will look something like rw- r– r–) the permissions settings page will open, allowing you to set the required permissions. Select the correct settings for the file then click OK to submit.
Domain name renewals
Sep 09 29
Expired domains
If you do not renew your domain name in time, you run the risk of losing the domain and any associated website/emails will go offline. How long it takes to go offline depends on the domain extension and which registry it came from.
.co.uk, .ltd.uk, .plc.uk, .me.uk
All .uk domains names are registered through Nominet. When your domian name goes past its expiry date you are given 30 days grace before the domain is suspended. As soon as the domain is suspended, any emails and website you had set up will go offline. The domain name will be held in suspension for a further 60 days and will then be deleted, then it will publicly be available for re-registration. The domain is still renewable at the normal price anytime during this 90 day period.
.com, .net, .info, .biz, .org, .tv
There are stricter (and possibly costly) procedures for these domain names. If you have any one of these domains and you do not renew, your site and emails will go down the next day and your site will change to a generic click site which is the domain registry’s default page. At this stage it takes upto 24hrs to come back online after the renewal payment has been processed.
Redemption period
Depending on the registrar used, the domain renewal will still be allowed at the normal price for approximately 30 days after the expiry date. Then it will be placed in a ‘redemption grace period’ during which time the domain owner would need to pay a redemption fee to release the domain before it can be renewed. The redemption fee can be upto $160 and is non refundable. This shows the importance of renewing your domain name on time.
Redemption fess do not apply to any .uk domain names.
Renewal reminders.
We will firstly send an automated email renewal reminder the month before your domain name/hosting package is due. e.g. Anything due for renewal in December, your first renewal reminder will be sent at the beginning of November to the billing email address we have on file for you, so it is important you keep your email address upto date.
We will follow up with a second reminder at the beginning of the month your account is due for renewal and a third to chase the renewal before the domain/hosting package goes past the expiry date.
Please note It is the clients responsibility to ensure any domain is renewed.
From time to time there are anomolies in any system which will result in you NOT being billed for a name. If you are not billed – we don’t get paid – we thus will NOT renew a domain name – it should ALWAYS be considered to be the clients responsibility to contact us and ask us to renew a domain name.
Google does not use the ‘keywords’ meta tag in its rankings!
Sep 09 28
There have been rumours around for a while that Google do not use the Keywords meta tag but now we hear it from the horse’s mouth.
What is the keyword meta tag?
Meta tags are HTML codes that are inserted into the header on a web page. You cannot see them on the website, you need to view the source code of the page to read them. Traditionally they have been a useful tool in optimizing your website for the Search engines.
A typical line of HTML code for a keyword meta tag would look like:
<meta name=”keywords” content=”Search engines, SEO, Google”/>
Many sites will have lines and lines of keywords seperated by commas as this has always thought to have been relevant to search engine results. Well now (as far as Google is concerned) they are not.
It’s official:
If you go to Google’s Webmaster Blog you’ll find a recent entry confirming that “Google disregards keyword metatags completely. They simply don’t have any effect in our search ranking at present.”
In addition to the official post, Matt Cutts who is one of Google’s Search Engine Optimisation guys, posted it on his own blog so I guess they really want to get the message across.
Shall I remove my Keyword Meta Tags?
Google doesn’t consider the “keywords” meta tags, but there are many other Search Engines that might use the meta tags for ranking the sites. Although it is the biggest search engine, it is not the only one so for Yahoo, Bing etc the Keywords can still be useful.
There is certainly no harm putting them in and it only take minutes if you know your subject, so we would still advise you to use them.
Robots.txt file
Sep 09 22
Have you heard of a robots.txt file? Do you have a robots.txt file on your website?  Search engine spiders and similar robots will look for a robots.txt file, located in your main web directory. It’s very simple and can help with your site’s ranking in the search engines.
What is a robots.txt file?
A robots.txt file is a small text file that you place in the root directory of your web site. This file is used to fence off robots from sections of your web site, so they won’t read files in those areas. Search engines often call these spiders and send them out to look for pages to include in their search results.
How do I create a robots.txt file?
Using a text editor such as Notepad, start with the following line:
User-agent: *
This specifies the robot we are referring to. The asterisk addresses all of them. You can be more specific by entering the bot name but in most cases you would use the asterisk.
The next line tells the robot which parts of your website to omit in their crawl:
User-agent: *
Disallow: /cgi-bin/
This would fence off any path on your website starting with the string /cgi-bin./
Multiple paths can be added using additional disallow lines:
User-agent: *
Disallow: /cgi-bin/
Disallow: /private/
Disallow: /test/
This robots.txt file instructs all robots that any files in directories /cgi-bin/, /private/ and /test/ are off limits.
If you want search engines to index everything in your site, you don’t need a robots.txt file (not even an empty one).
Using meta tags to block access to your site.
You can also use Meta tags to the same effect.
To prevent search engines from indexing a page on your site, place the following meta tag into the header of the page:
<meta name=”robots” content=”noindex”>
Not all robots may support the robots.txt directive or the Meta tag, so it is advisable to use both.
You can learn more about robots.txt files here.
Google Webmaster Tools
Sep 09 18
 Do I need a Google Webmaster Tools account?
Google Webmaster Tools is a great resource for any site owner. and a must for anybody who is serious about making a search engine friendly site.
Creating content for the web is easy, but getting people to discover it is the hard part. You want your site to be as search friendly as possible. You want to know how your website interacts with the search engines and you want to be made aware of any problems with your site that may prevent people from reaching you. Webmaster Tools gives you all this information, it’s Google’s way of giving site owners the best information they need to have a successful website.
Features:
- First of all it’s free! A wealth of useful information at your fingertips and all you have to do is sign up.
- Top search queries tool which gives information about user search queries which have returned pages from your site.
- A Sitemap tool which allows you to submit an XML Sitemap with details on pages you would like Google to index and the priority of your pages so Google knows which ones to crawl first. If you do not have a site map create one and submit it to the site configuration sitemap section of your account.
- Diagnostics section which reports errors that were encountered when your site was crawled such as problems with the sitemap, pages not found etc. It also gives you HTML suggestions to improve your visitor’s experience and performance.
- Change of address option, which is a special tool to tell Google about your new domain name and helps to move your old site users to you new domain easily.
- Top search queries tool has information on the keywords and phrases that your website appeared for, the percentage of clickthroughs to your website, along with the keyword position.
- Links to your site tool provides information on inbound links with anchor text for your site pages.
- Keywords and internal links tool shows the common keywords Google sees when it crawl’s the site and internal links shows the total number of pages linked by other pages in your site.
- A vast amount of extra help topics, articles, forums resources are also available, all there to help you make the most of your website.
Setting up your Google account.
Getting started with Google Webmaster Tools is not to difficult. The first thing you’ll need is a Google account. Google has combined, or converged, their different accounts such so if you have If you use Gmail, Adwords, Analytics, iGoogle or one of the many other services, then you are ready to go. If not, sign up for a free Google Account. Once you have an account and sign in, the top right corner of Google will now have a “My Account” link. Click on that link and from the page that loads, click on “Webmaster Tools”.
Veryfying your domain.
Once you have added your domain to the dashboard, you need to verify it. To verify, you either upload a text file to the root of the website or add a meta tag to the index page. Once you upload the file to your web site (or modify the home page with the meta tag), you click the “Verify” button and Google will check to see if the file or meta tag is there. Once Google finds it, you are verified and able to access all the information about your site.
Do I need a sitemap?
You can also submit sitemaps using Google WebMaster Tools. A sitemap is a file that list pages on your site that you want Google to know about. Follow the “more information” links in the site map section to find out more information about creating a site map. According to www.Sitemaps.org a sitemap will allow search engines to more intellingently crawl your website. More details and FAQ’s about sitemaps can be found here.
Robots.txt file
Web site owners use the /robots.txt file to give instructions about their site to web robots; this is called The Robots Exclusion Protocol.
Web robots often go by different names. You may hear them called:
- Spiders
- Bots
- Crawlers
To find out more about the robots.txt file click here.
There are many features to WebMaster Tools. Hopefully this overview has given enough information for you to get it set up and start benefitting from it.
