How to use your computers ‘hosts file’
May 13 14
Each computer has a host file, which is used to map hostnames to IP addresses. This can show you what your website will look like on another server before it goes live, which is handy for previewing or testing your website before you change the server.
The following instructions explain how to use it.
WINDOWS
On a Windows pc firstly you need to open the Notepad application, but you need to open it with Administrator priveleges. To do this go to ‘All Programs’ then ‘Accessories’ and then right click on the Notepad icon and click on ‘Run as Administrator’
You then need to open the Hosts file by clicking ‘File’ then ‘Open’ and navigate to the hosts file which is in the following location:
c:\windows\system32\drivers\etc\hosts
Your hosts file will look like this:
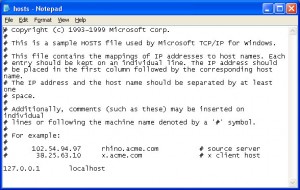
You can then enter the new server IP address along with your domain name to make your computer show your website from that server.
For example if we are switching your website onto a server with ip address 87.239.18.108 you enter the following line underneath localhost:
87.239.18.108 www.mydomainname.co.uk
Once this is entered you save the changes to the file and then close Notepad.
You then need to ‘Flush the DNS’ on your system to make sure the changes are saved correctly. To do this open the Command Prompt screen by typing cmd in the Windows search. Once the screen is open type the following:
ipconfig /flushdns
Then press enter.
You will receive a message to say that the DNS cache is successfully resolved.
This will then make your browser see the website on the new server, even though it is not live yet.
MAC
On a Mac the hosts file is located at:
private/etc/hosts
To edit the hosts files, open the terminal which is located at /Applications/Utilities/Terminal.app, then enter the following:
sudo nano /private/etc/hosts
The screen will look like this:
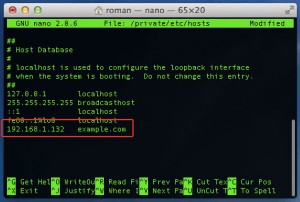
You then use the arrow keys to move the cursor to the end of the last line and then enter your new line. When you have entered the line save the file by pressing Control + O keys. It will ask where to write, with the Hosts file already typed, press Enter to overwrite.
To then flush the DNS cache type the following command:
dscacheutil -flushcache
Then press Control + X to close the terminal.
How to set up your email account on a Galaxy S3
Mar 13 19
The following instructions are for setting up your domain’s email address on a Samsung Galaxy S3:
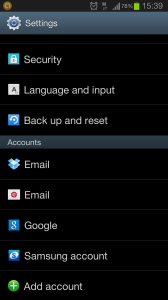
Firstly go to the Settings section of your Phone and scroll down to Add Account
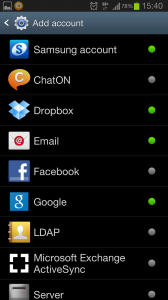
Then choose Email to enter your account settings.
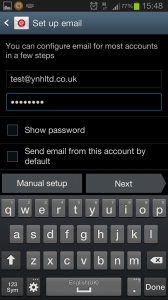
Enter you email address and password, then click on Manual Setup
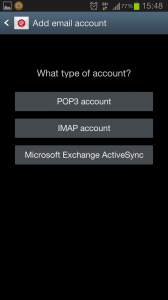
You will then be asked which type of account you would like to set up, in most cases this will be POP3
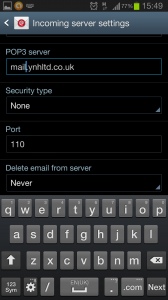
You will then be asked for the address of your POP server which is mail.yourdomainname.co.uk (just replace yourdomainname.co.uk with your actual domain name)
You don’t need to enter a security type and the port number should be 110 (which it will be by default)
Then go to Next
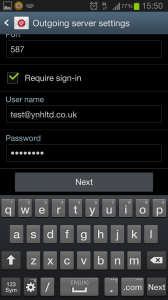
You then need to enter the settings for the Outgoing Mailserver. Tick the ‘Require Sign In’ box and then enter your email address and password again.
Then click on Next.
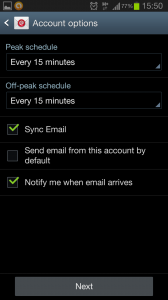
You will then be shown additional account options such as receiving a notification when an email arrives.
If this is the main email account on your phone you can tick the box which says Send email from this account by default.
Then click on Next.
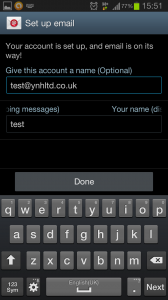
The account is then set up. You can give the account a name if you wish and then enter your name, as you want it to appear in a recipient’s mailbox.
Then click on Next and you’re done.
DNS Records Explained
Jan 13 28
Most website owners would not know about, or would ever have heard of DNS.
But without it they would not have a website, nor would they be able to send and receive emails.
DNS or (Domain Name System) is a database system that contains mapping of domain names to their IP addresses. The DNS records are added to the web server and this is what makes your website and emails resolve across the Internet.
 There are several different types of DNS records. Most websites will have the following types of DNS:
- A RECORD – An A record assigns an IP address to a domain or sub-domain. (e.g – your-name-here.co.uk points to 209.204.202.85)
- CNAME – A CNAME record or canonical name record makes one domain name an alias of another. The alias acquires all the records of the original domain. (e.g. – www.your-name-here.co.uk is a CNAME of your-name-here.co.uk)
- MX RECORD – An MX record or mail exchange record specifies which mail server is responsible for accepting email for a domain name (e.g. – mail for your-name-here.co.uk is handled by ALT1.ASPMX.L.GOOGLE.COM)
- NS RECORD – An NS or Nameserver record specifies which servers will implement the DNS service for a particular domain name (e.g. – your-name-here.co.uk points to ns.host4u.net and ns1.host4u.net nameservers)
- PTR RECORD – a PTR record resolves an IP addresses into a hostname, this is sometimes referred to as ‘Reverse DNS’ (e.g. – The PTR record for your-name-here.co.uk is ‘85.202.204.209.in-addr.arpa’
With Your Name Here we assign a control panel with each domain registration, which allows you to modify your DNS records yourself. However DNS records can be quite complicated and you should only modify the DNS if you know exactly what you are doing.
You can request DNS changes via our support section, or by emailing us directly.
Low price continues for hugely popular Site Builder
Jan 13 10
Since we launched our new Web Presence Builder several months ago, it has proven to be a big hit.
We will be keeping the price of this offer at £29.95. When you consider the price includes the registration of a domain name, 250MB of web space and the easy to use site building software, it really is an offer not to be missed.
The Site Builder package is perfect for anybody who requires an online presence, but does not have any technical knowledge or experience with Web Design:
For more details and instructions on how to order please got to:
http://www.your-name-here.co.uk/site-builder.html
How to set up your email account in Windows Mail
Dec 12 13
The following instructions are for setting up a new email account in Windows Live Mail.
1. On the top navigation panel, click on ‘Accounts’ and then click on the Plus sign to add a new account.
Then enter your email address ans password and tick the box which says ‘Manually Configure Server Settings’ and then click ‘Next’
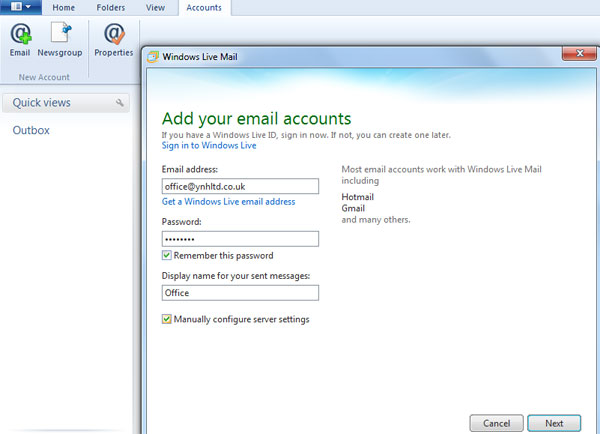
2. Choose pop or imap and enter the incoming mailserver details which will be mail.yourdomainname.co.uk (obviously replace yourdomainname.co.uk with your actual domain name).
The username will be the full email address you are setting up and the password will be the same password you set up for the mailbox in your control panel.
You can also refer to your confirmation email for further details on setting up emails in your control panel.
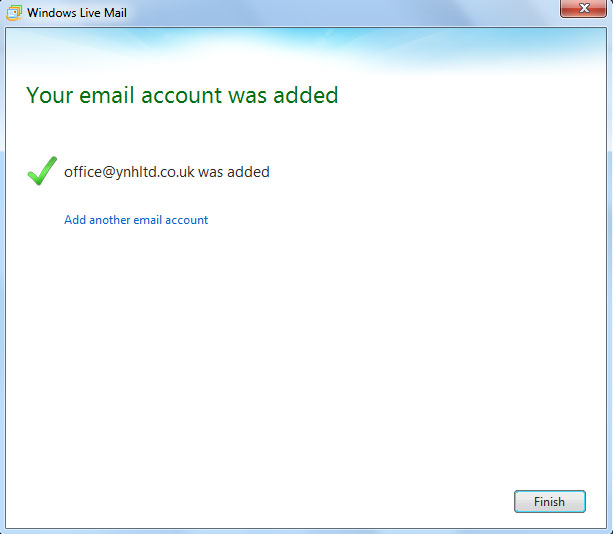
3. The account is now added, but to be able to send emails you need to ‘authenticate’ the Outgoing Mailserver.
Go the the ‘Properties’ section then click on ‘Servers’ and tick the box which says ‘My outgoing server requires authentication’ then click on the ‘Settings’ button.
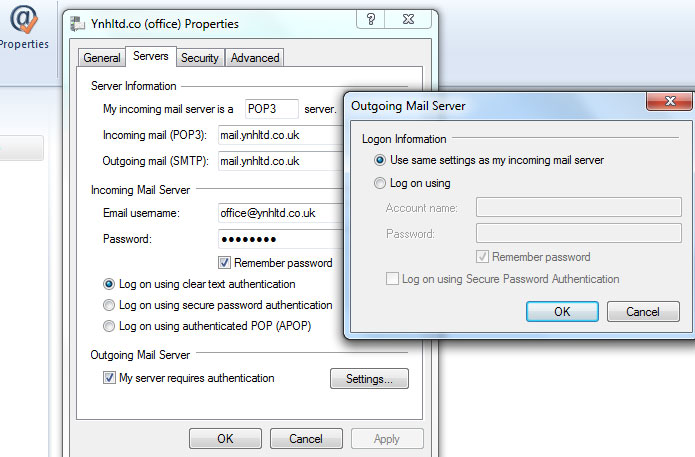
Tick the box which says ‘Use same settings as incoming mailserver’ and click ok.
The account is then set up and ready to send and receive emails.
How to send and receive your domain emails using Gmail servers.
Dec 12 10
 A Gmail account is very easy to set up and can also be used to send and receive your domain name’s emails.
This is a very handy freebie which can come in very useful for people who are having problems sending emails using their Internet Provider.
They also allow a huge 8GB of storage space for your account. This will be particularly appealing for users with IMAP accounts, whereby all the emails you send and receive are stored on the server and this does require a lot of space.
The instructions for setting up your domain name emails in Gmail are as follows:
1. If you do not have one already, sign up for a Gmail account here
2. Once you are signed up, go to your homepage/inbox and click on the ‘Settings’ section in the top right of the screen.
3. Click on ‘Accounts and Import’ and then click on ‘Add another email address you own’
4. Enter your email address and then choose the ‘Send through Gmail’ option.
5. You will then be prompted to send verification to your email address to confirm you are the owner. Once you receive the email follow the instructions.
6. Then go back to ‘Settings’ section and your email address will be listed as an alternative to your Gmail one.
7. Click on the ‘Make Default’ button to make this your standard email address.
Pointing your domain’s mail records to Google
Each domain name has ‘DNS records’ which tell the Internet which web servers handle your website and emails. When you set up your mail with Google, you then have to modify your ‘MX Records’ to let the Internet know that Google will be handling your mail.
To do this you need to login to your Control Panel and go to the DNS section.
Then highlight your existing MX records and click on ‘Remove’
Then you need to add the following records:
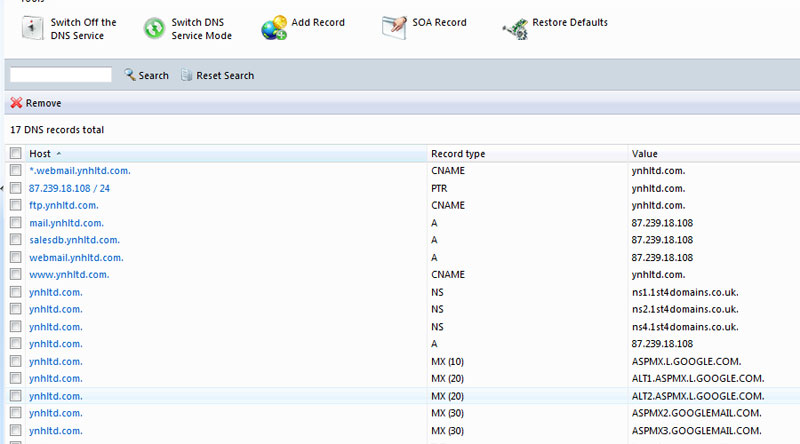
The above MX records will point your emails to Google so that their mailservers can handle your emails.
For a full explanation of how DNS records work please visit the following page:
http://www.your-name-here.co.uk/blog/2013/01/28/dns-records-explained/
How to set up an email account in Thunderbird
Nov 12 12
The following instructions are for setting up your domain’s email address in Mozilla Thunderbird:
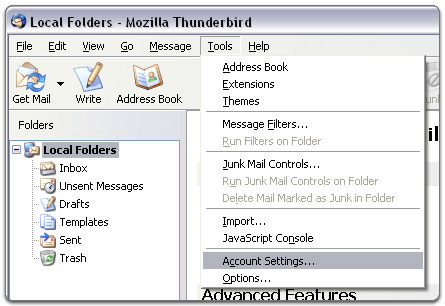
1. In Thunderbird, go to the Tools menu and then select Account Settings. Then go to Account Actions and click on Add Mail Account:
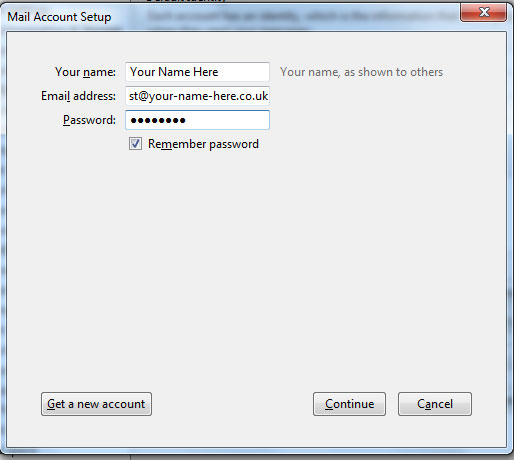
2. Enter your name email address and password and click on Continue.
3. Click on Manual Config to enter your own server details:
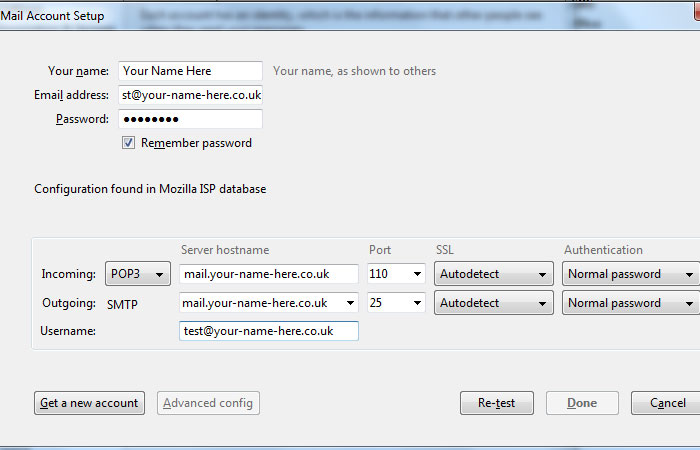
3. Choose pop or imap and enter the incoming mailserver details which will be mail.your-name-here.co.uk (obviously replace your-name-here.co.uk with your actual domain name).
The port numbers are 110 for the incoming mailserver and 25 for the outgoing mailserver.
You should choose Normal Password to authenticate the servers
The username will be the full email address you are setting up.
Then click on Done and your account will then be added to Thunderbird.
How to set up email account in Outlook with SMTP authentication.
Oct 12 11
The following instructions are for setting up a new email account in Microsoft Outlook with our outgoing mail accounts you are required to ‘authenticate the outgoing mailserver’ (SMTP server) The instructions below show you where to do this:
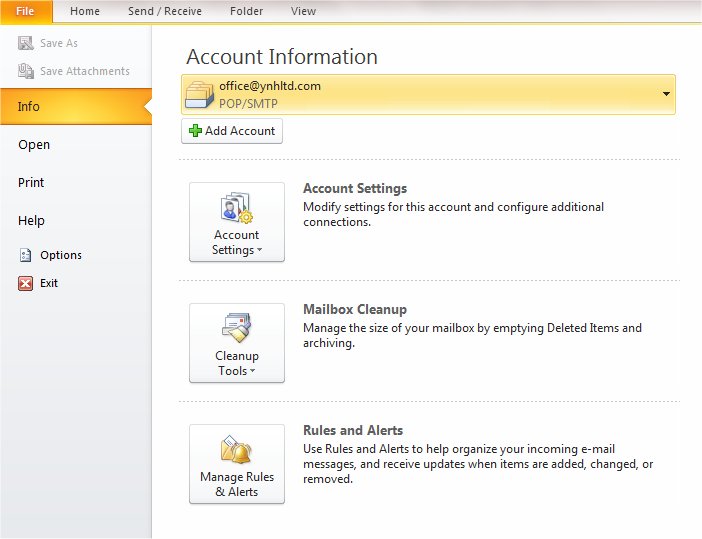
Firstly click on ‘File’ and ensure ‘Info’ is highlighted and then click on ‘Add Account’
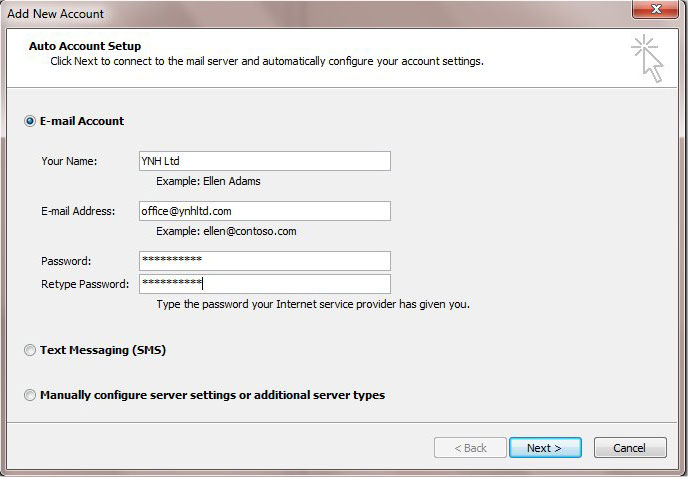
Enter your name, email address and password and click on ‘Next’ If the account is not automatically found you can click on ‘Manually configure server settings’
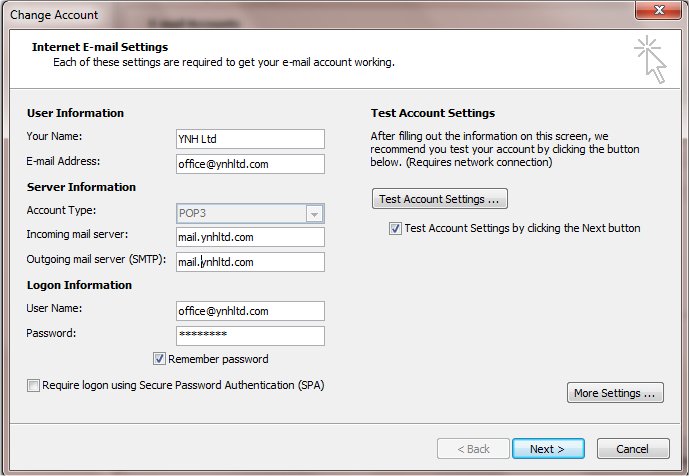
Choose pop or imap and enter the incoming mailserver details which will be mail.yourdomainname.co.uk (obviously replace yourdomainname.co.uk with your actual domain name).
The username will be the full email address you are setting up and the password will be the same password you set up for the mailbox in your control panel.
You can also refer to your confirmation email for further details on setting up emails in your control panel.
To go to the Outgoing Mailserver section click on ‘More Settings’
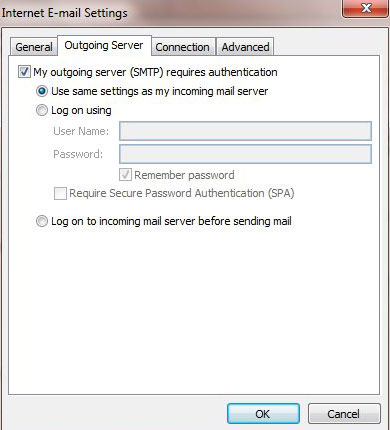
Make sure the box which says ‘My outgoing mailserver requires authentication’ is ticked and then choose the option which says ‘Use same settings as incoming mailserver’
All other boxes can be left unticked.
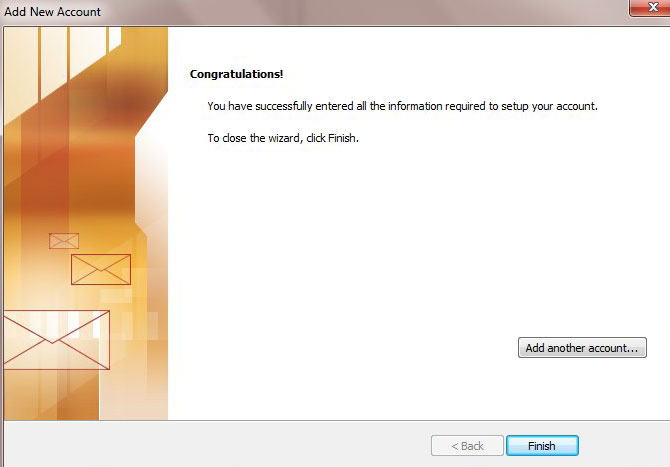
Click ‘Ok’ and then click ‘Finish’ to complete the account set up.
How to set up your email account on your Iphone
Sep 12 21
The following instructions are for setting up your domain’s email address on your Iphone, Ipad or Ipod Touch:
Firstly go the the Settings sections of your device and click on ‘Mail, Contacts, Calendars’ and then click on ‘Add Account’
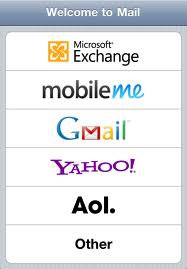
The go to ‘Other’ and then ‘Add Mail Account’ to start setting up your domain’s email address.
You will then be given the screen above in which you enter your Name, the email address you are setting up with it’s password and a description of the account.
Then click on ‘Next’ to enter the mailserver details.
Choose pop or imap and enter the incoming mailserver details which will be mail.yourdomainname.co.uk (obviously replace yourdomainname.co.uk with your actual domain name).
The username will be the full email address you are setting up and the password will be the same password you set up for the mailbox in your control panel.
You can also refer to your confirmation email for further details on setting up emails in your control panel.
Then scroll down and enter the details of the Outgoing mailserver, which will be exactly the same as the incoming (as above) and click next.
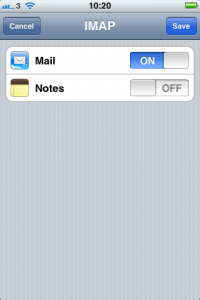
Once the account is accepted you will see the above screen. Click on’Save’ and your account will be added to your device.
You can then go to your home screen and click on ‘Mail’ to view/manage your emails.
Congratulations Anthony Ogogo!
Aug 12 10

It’s been a great run for Anthony Ogogo in the 2012 London Olympics. Anthony upset Ukraine’s world number one Ievgen Khytrov on his way to the Semi Final, but he was unable to get past Brazil’s Esquiva Falcão and will settle for a bronze medal in the Middleweight competition.
A big congratulations from Your Name Here, we are happy to host your website!
