Occasionally when you set up an email account on your email client or phone, everything looks fine and you are able to receive emails but there is something stopping you from sending emails. This seems to be quite common on the iphone and on Macmail. Below is a step by step guide for the correct settings on each device:
1. Iphone – When setting up a new account in an iphone you are asked for the details of the incoming mailserver first:
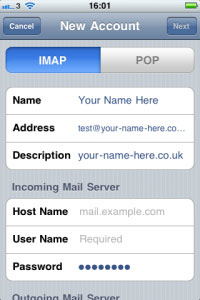
The Name will be whatever name you want to appear in emails you send, email is obviously the full email address you are setting up and the description can be anything you want to use to refer to this account. Then for the incoming mailserver you enter the details of the account. The hostname will be mail.your-name-here.co.uk (replace your-name-here.co.uk with your own domain name), the username is your full email address and the password must correspond to the address you gave the mailbox in your control panel.
When you scroll down you are then asked for the user details of the Outgoing Mailserver:

All the details for the outgoing mailserver should be exactly the same as the incoming server. Once you have entered these details again click on next and you should then be ready to go.
If the account is still not working at this stage you can double check the SSL and the Port Numbers. You may receive an error prompting you to do this, or it may be that you just cannot send an email. In this case you can go back into the account settings from your home screen:
1. From the home screen, Tap Settings.
2. Tap Mail, Contacts, and Calendars
3. Tap the Email Account you wish to edit.
4. Tap SMTP under Outgoing Server
You then have the option to change the port numbers and switch on/off the SSL.
For email accounts hosted with Your Name Here you need to ensure that SSL is switched OFF, and you need to have the Outgoing Port number as 25. If this does not work try changing the Port number to 587.
2. Macmail – Similarly with Macmail you are asked for the details of the incoming mailserver first:
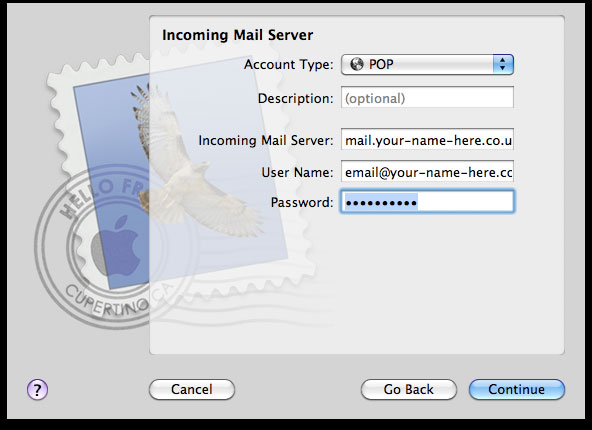
Again The mailserver will be mail.your-name-here.co.uk (replace your-name-here.co.uk with your own domain name), the username is your full email address and the password must correspond to the address you gave the mailbox in your control panel.
When you press continue Macmail then takes you to the security page:
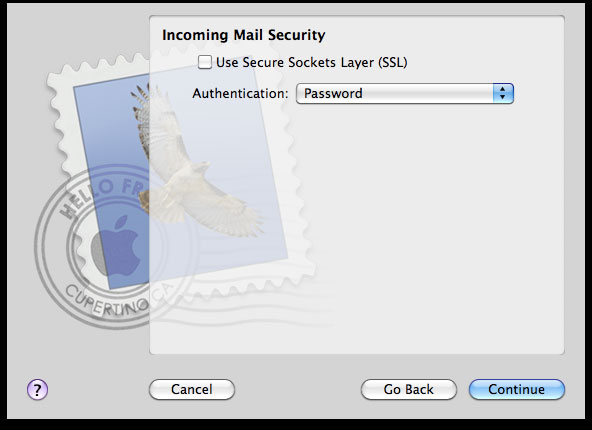
This is where you confirm that SSL is NOT enabled and for Authentication you can leave it on Password.
Clicking continue will then take you to the settings of the Outgoing mailserver:
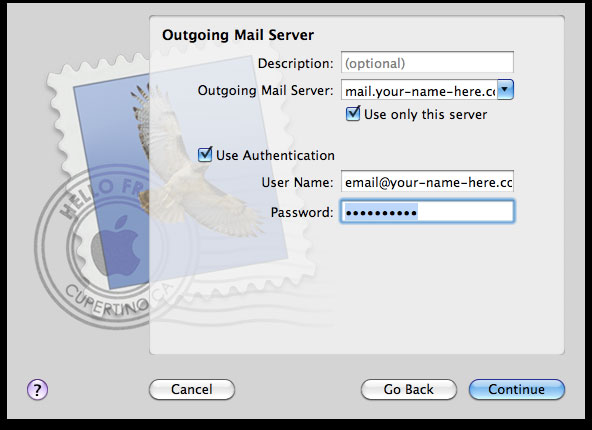
The outgoing server address is the same as the incoming. Then ensure you have ‘Use this server only’ and ‘Use Authentication’ ticked. Then enter the same username and password as the incoming mailserver. You will then be taken to the security page for the outgoing server:
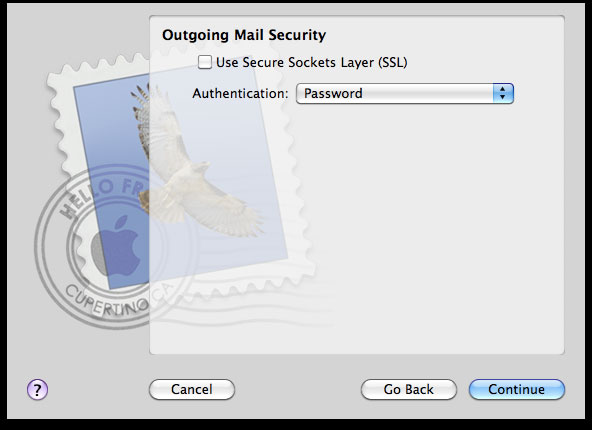
Again make sure SSL is NOT ticked and keep authentication to ‘Password’
Click continue and you are then given an account summary/confirmation page:
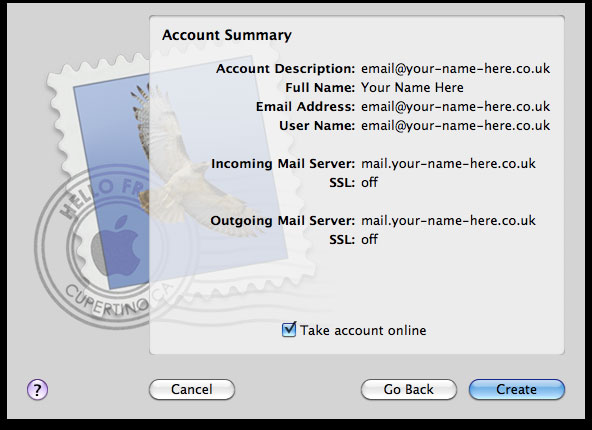
The account should be working now but if it is not you can then double check the port numbers. To do this on Macmail:
1. Select Mail / Preferences
2. Click the Accounts button, located at the top of the window.
3. Click once on your account, as it appears in the Accounts list.
4. Click the Advanced tab.
5. Have the Outgoing Port number as 25. If this does not work try changing the Port number to 587.
